 There’s nothing sadder to me than when I see someone who’s finally started taking steps to build up their food storage, only to hear that they’ve wasted tons of money by having to throw food out. I see folks buy foods regularly without being mindful of the best way to store it. More unfortunate is that folks are throwing away perfectly good grains when there’s no need to. The good news is that you don’t have to waste your food storage money this way. I’m going to show you how to maximize every precious buck! This article is to help you understand how NOT to waste all of that hard work and food storage money.
Two things to keep in mind when storing food:
1) Environmental storing conditions
2) Storage containers.
When it comes to the ideal storing conditions, you always want to store your dry foods in a cool, dry place. When I purchase MRE’s, I always request certifications or attestations of HOW they were stored prior to shipping them to me. That’s a heck of a lot more important to me than when they were manufactured. A cool, dry environment is your ideal storage condition.
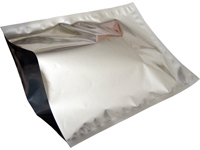
When you’re buying foods, remember plastic is porous. Aluminum and Mylar are much better, but well-sealed glass containers are ideal. The sooner you can transfer things from a cheap paper box or plastic bag into a Mylar bag, a #10 can, or a Mason jar, the better and the significantly longer shelf life you’ll enjoy. In fact, the shelf life of foods stored in this way usually last 3 to 6 times longer than your original expiration food information! (See, we’re keeping up with the rate of inflation already.)
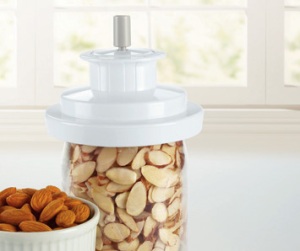
 Don’t be afraid to buy chocolate chips, candy bars, or almonds on sale. You don’t need to eat them all right away. Simply store them in a vacuum packed Mason jar. A Foodsaver comes with a jar attachment that you simply put on top of your partially lidded jar, suck the air out, and then put on the ring. It’s that easy. (See Foodsaver operation instructions for more details.)
If you have something finely powdered such as cocoa, cornmeal, or Kool-aid, put it in a bag first, squeeze out the air, and then put it in the jar.
With granola bars, candy bars and the like, simply poke a small pin prick in the wrapper, put them in the jar and seal them. You can look forward to those peanut M&Ms for a few years down the road.
Think about all of the food items that this storing method will help you with!
- Raisins
- Chocolate Chips
- Nuts (all kinds)
- Volatile grains
- Candy bars
- Dried fruits (dehydrated or freeze-dried)
- Bacon bits (real or artificial)
- Parmesan cheese
- Cereals (warm or cold)
- Pasta
- Rice
- Beans
- Soup mixes
- Spices
- Dried herbs
- Beef Jerky
- Cookies
- Malt-O-Meal
The possibilities are literally endless! The best part about this method is you can keep doing this so long as you have electricity. Once you open a jar, you can simply reseal it as long as the lid hasn’t been damaged during the opening process. You can extend the life of the foods that you’re living on every day. It only takes a few second per jar to seal—the time is SO worth it!
Note: This method is NOT good for items that need to be refrigerated as a pressure canning process is typically needed to preserve such items.
Do you see weevils or critters in your dry foods? Don’t worry about it. Simply place that wheat, oats, rice, etc. on a small cookie sheet in your solar oven for an hour at 200 degrees, then sift through it, and your dried foods will still be just fine and nutritious without the unpleasant hitchhikers.
I hear of way too many people throwing out their brown rice, complaining that it goes bad too fast. Can I just say “stop that”? You can store brown rice for years in a sealed Mason jar. Oats sealed in a #10 can should keep their shelf-life for 10 years if stored under ideal circumstances.
If a product is stored in a dent-free, sealed #10 can, it should have a long shelf life of years! If it’s a more volatile food, put it in a sealed Mylar bag with an oxygen absorber or a Mason jar and then rest easy for a long shelf-life.
Speaking of oxygen absorbers, did you know that bay leaves also act as a great oxygen absorber? All you have to do is put a couple of bay leaves in your quart jars, or about 5 of them in a #10 can, and voila! You’ve got an inexpensive oxygen absorber that you can EASILY grow right in your own yard.
 A Mylar bag sealer with Mylar bags can be obtained for about $200 dollars. It’s great for my more finely powdered items such as cornmeal, risotto, and coconut. You can use a flat iron in a pinch to seal a Mylar bag, but it’s not as reliable for putting suitable pressure and heat on the bag. So double check your bag if you’re using this method.
Remember, sugar is sugar no matter how old it is. It simply doesn’t go bad. You don’t have to worry about whether to store it in a 5 gallon bucket or a bag. But if you store it in a bucket, you can put in a “brown sugar bear” in with it (easily purchased at any cooking store) and it will keep its fine consistency.
Yeast has a shelf life of about 1 year on your shelf. But if you keep it in your freezer, it has an INFINITE shelf-life. I’ve been using my yeast for my bread right out of the freezer every time I make it.
If you open a can of food and it seems to have taken on the smell of the can, don’t worry. You STILL don’t have to waste your food storage money by throwing it out. All it usually needs is a little bit of aerating. Just set it out in an open container and let it air out. It can take a couple of days or a couple of hours. A little bit of oxygen goes a long ways!
While your shortening that comes already sealed in a can will last 3 years as is, you can also can it by melting it and then sealing it. You’ve now got a 5 to 10 year shelf life! The same goes for butter! You don’t have to ever be without REAL butter! (There’s been a great deal of controversy about bottling butter, but I’m finally willing to come out and say that it’s JUST FINE AND DANDY to do!)
In the future, think twice about throwing food out or storing it “as is” from the manufacturer. Now you don’t have to waste your food storage money.
For additional information on perishable foods, check out “Yes, You Can Easily Can Meat”.
Copyright 2009 Preparedness Pro & Kellene Bishop. All rights reserved. You are welcome to repost this information so long as it is credited to Preparedness Pro & Kellene Bishop.
Subscribe to Preparedness Pro today and never miss a thing!
